"Make me want to obey You rather than be rich.
Take away my foolish desires and let me find life by walking with You."
~ Psalm 119:36-37

Monday, November 22, 2010

More endless gifts…

I give thanks for all He has entrusted to me:

18.  morning birds

19.  Early Thanksgiving with family

20.  Long car trips

21.  Books on CD for long car trips

22.  Family far away for switch to justify long car trips

23.  good sleep

24.  5 days of panties for the potty trainee (with only 1 accident)

25.  warm house, this house for until “the perfect time”

26.  riding (not driving) the long car trip

27.  worshipping with family

28.  pie – made by Grandma

29.  dirty laundry (remind me I’m thankful for this…) = we are clothed & warm

30.  2 girls piled in bed with 4 year old “reading” books to her younger sister

31.  Christmas surprises tucked away

32.  books, books, more books

33.  mid-November warmth & sunshine

34.  yummy rolls baking

35.  home grown beef coming to my freezer

36.  family over for dinner

37.  quiet in the afternoon

38.  no dishwasher means I can enjoy the gorgeous mountain view from my kitchen window a bit longer!

39.  dinner with mom & dad

40.  selfless husband

41.  new music

42.  old music

43.  kids’ love of [most] music

44.  stacks of winter coats & blankets

45.  baskets & bags


So many more.  Endless gifts…join me in counting yours.

Monday, November 15, 2010

Endless gifts…

About 2 years ago I began to journal…just write stuff.  It began as a calendar sort of thing, to remember “firsts” & funny things the girls did.  The original purpose transformed into a prayer journal & place for sermon notes, quotes I like, stuff I want to have all in one place.  Then I ran across the challenge to  count the endless ways He blesses me and added it to the journal too! 

Somewhere midst the packed boxes of books in storage (waiting for their final destination in our new home that we haven’t found yet) are 2 journals containing lots of memories, struggles, tears, laughter…and LOTS of ink.  I just finished my third one.   There, among the pages of those journals, are the gifts He gives me in the everyday chaos.  Someday as I  dig through and read them, I’ll record those first gifts here…all in one place…but until then, I’ll begin a new list here…

1.  coffee

2.  quiet mornings

3.  sleepy faces hidden by lots of hair

4.  Christmas music

5.  Lazy days of no schedule

6.  Friends who are family

7.  Recipe gathering & baking day

8.  Belly growls quieted by homemade yogurt & granola

9.  Cinnamon rolls (enough said)

10.  Pizza

11.  Zumba

12.  old friends

13.  contagious giggles

14.  a no “pull-up” day (even though there were 2 accidents)

15.  sore muscles

16.  summer’s harvest in the oven

17.  my love…obsessing along WITH me! 

So many more.  Endless gifts…join me in counting yours.


del.icio.us Tags: ,,

Wednesday, June 9, 2010

Germination Station

*I’m a slacker….I just realized that I never published this blog entry about my germination station…now, my plants are transplanted and growing like CRAZY in the gardens out back.  I’ll have to do a REAL update on the progress this week.*

I don’t know if I stole the term “germination station” from somewhere or not…but it’s pretty funny.  Don’t get too excited about the presentation of the germination station…it’s quite ghetto!  (but definitely effective – and cheap since it cost me $22   TOTAL)

  • $7 replacement florescent bulbs for my 4’ shop lights(mine were black lights from a church presentation thing)
  • $5  timer for “grow lights” (because there’s no way I’d remember to turn them on and off at the same time every day)
  • $10 2 mini green houses (black tray, black tray with drainage, cell pack, clear dome lid)

And THIS is it:

[pic of germ. stat.]

(Well, this is the finished product of the “heat lights”.)  I should take a pic of the whole setup with the “grow lights” too. 

The whole setup can be reused next year (after sanitizing the mini greenhouses with a bleach/water mixture), so that’s a SUPER inexpensive initial investment I think!!!

My last gardening post I mentioned that pics of my little seedlings were coming soon  (left you hanging didn’t I…bet you’re glued to your computer chair huh?) .

Germination Station - we have green (1)   

Tray 1 of 2 (cucumbers, squash, some flowers, herbs, jalapenos)

Germination Station - we have green (20)

Cucumbers (tendergreen & National Pickling)

Germination Station - we have green (21)

My friend, Ali, says that people start their own seeds because of cucumbers!  She said, “After 2-3 days of waiting on dirt, they sprout and give us hope for the slow pokes.” (or something like that).  When I saw those first little leaves poking out, I felt like doing a celebration dance.  I’m pretty sure there was clapping and some whooping going on in the germination station area of the garage on seed spouting day.  :o)

Germination Station - we have green (27) 

Tray 2 of 2 (Tomatoes, tomatoes, more tomatoes, and some Alyssum flowers)

Germination Station - we have green (37) 

The Alyssum

Mr. Handsome is going need to hang my growlights from a “permanent” location because they’re getting sooo tall.  Right now, they’re just sitting on top of 6in pieces of wood (which has/will work fine until about Sunday or Monday.)

About our garden boxes, they are still empty (of plants/seeds) but all that’s going to change today.  It’s supposed to be unbelievably gorgeous outside today, so in goes the lettuce/spinach/carrots/onion sets.  I started onions from seed too, but none of my gardening family/friends had done that before and I was a bit uncertain of the outcome, so I bought some sets too.  So far, the onions have come up…kinda droopy yesterday (but that’s because I didn’t check the water the day before and it was pretty WARM in the germination station area of the garage yesterday afternoon.  So, hopefully, after a little drink, they’ll perk back up.

Back to dirt, we filled the last 2 boxes last Saturday with 4 more batches of Mel’s Mix.  We needed some additional “poo”/compost and other dirt ingredients:

  • 2 bales 3.0 cu ft peat moss (Lowe’s) $8.96
  • 4 Black Kow manure (Local Garden Center) $4.25
  • 6 Manure compost & humus mix (Lowe’s) $1.47
  • 4 organic soil conditioner (Lowe’s) $2.68
  • 4 vermiculite –they were out of coarse, so I had to get fine, which we liked the use of more but we’ll see the outcome of the “dirt” once planted (Local Garden Center) $12
  • 3 mushroom compost (Local Garden Center) $3

Because of the “fine” vermiculite, it seems to fill the boxes with less “dirt” so we had a bit left over.  We put part of it in a rubbermaid-like tote to use as potting soil for my transplants (which will not be too long) and the other part we split into 2 pots for my daughters K(3) & C(1) to have their own “garden” spot.  (Really, this is so they can dig in their own dirt and leave my plants and dirt ALONE!!)

Yummy for dinner…

Beef & Broccoli Stir Fry

  • 2 T teriyaki sauce (or soy sauce)
  • 1/4 t crushed red pepper  (the orig. recipe called for 1/2 t but my girls think it's too hot.)
  • 1 lb (ish) cubed steak
  • 1 T olive oil
  • 1/4 c water
  • 1 garlic clove, minced
  • 1 small onion, minced
  • 3 c broccoli (or any veggie combination...we usually use broc/cauliflower or whatever veggies are in the crisper)
  • 6 oz cooked pasta (we usually use angel hair or spaghetti - whatever we have)

MEAT MARINADE PREP:  Lay out steak between 2 pieces of saran wrap so there's space between the steaks.  (you can sprinkle the meat tenderizer seasoning stuff on it if you have it...my mom does, but i never think to buy any, so we've never used it.)  Using a meat "beater" (I think the official term is meat tenderizer), pound the steaks until very thin. *You do this to help break down the meat since it's a lower quality than other steaks and, therefore, NOT as tender...thus the name - meat tenderizer.*  After pounding thin, cut steak into strips or bite sized pieces and toss in a bowl with 2 T teriyaki sauce, water & red pepper.  (Don't be scared to add more teriyaki sauce than called for...the more teriyaki/soy sauce...the better.)  Cover, shake well & refrigerate 20 min or till whenever (again, the longer, the better.)  Take it out and shake it occasionally to mix all the yummy goodness together. 

When ready to prepare, cook the pasta and rinse with warm water, set aside.  Cook broccoli (or veggie blend) separately if you don't like it crunchy.  Heat oil in skillet, add garlic, onions, & raw veggies (if you didn't cook them separately) and steak WITH the marinade too.  Saute bout 8-10 min or until meat is done and veggies are tender.  Stir in noodles & more teriyaki/soy sauce if you want.

We LOVE LOVE LOVE to fix this for company because you can use the same amount of meat, just add more veggies & pasta, and it goes A LONGGGGG WAY!!!  (So don't be surprised if you have it for dinner over here sometime.  ;o)

**Adapted from Sept/Oct 2004 Weight Watchers Magazine**

Thursday, June 3, 2010

Growing our food…

In this whole process of eating more whole foods (in order to…eventually…go TOTALLY whole foods), I’ve stumbled across the most inspiring family. 

Dervaes Family Urban Homestead

You really MUST check out the amount of food they grow on their TINY piece of the world.  Like I said….very inspiring.  And here we are…trying to move to more land in order to have bigger gardens (and to be “allowed” to raise chickens!) If you’ve ever wondered if you have space to grow ANY food…you need to check the Little Homestead in the City.

Wednesday, June 2, 2010

A little birdy told me…

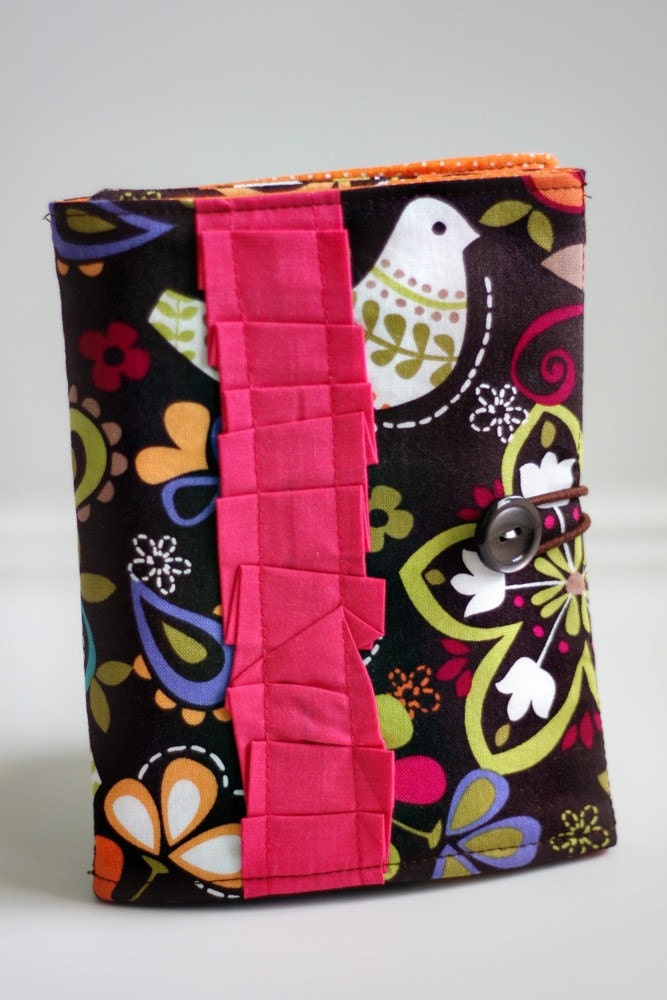
Happy Little Picture Keeper w/ Ruffles

…that this has to be the cutest thing EVER.  K & C would LOVE, LOVE, LOVE to own one of these “Happy Little Picture Keepers”.  Best part about it…

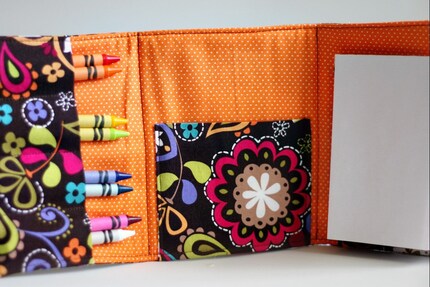
Happy Little Picture Keeper w/ Ruffles

…it opens up to hold crayons, paper, and a pocket for the crazy amount of random stuff they carry with them at ALL times (especially K!!!)

Now this…this is for me:

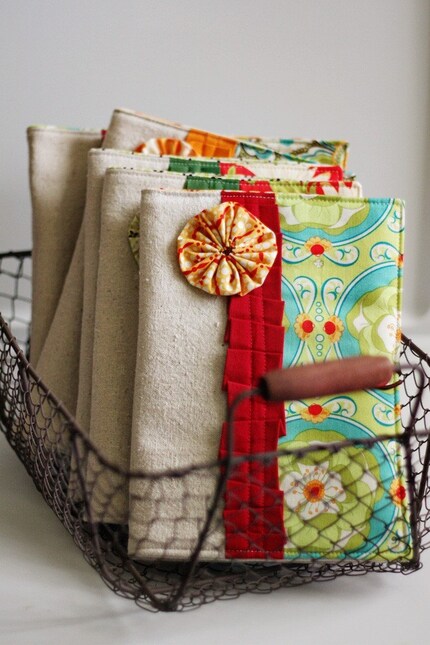
NEW Ruffled Happy Little List Taker (Ready to Ship)

(and I wonder where K gets her love for all things paper?) I am in LOVE with journals and things to hold lists….like this “Happy Little List Taker.”

You NEED to see the other ridiculously cute things in Andrea’s Etsy Shop.  Wanna chance to win one??  Do it.

Friday, April 2, 2010

Yummy goodness

My latest new FAVORITE recipe is Grandma's Granola.  Now, that doesn't seem too impressive (or even a possibility in my friend, Ronda's, opinion..."Can't you buy granola at the store?" she said to me.)  But this is GOOD stuff, the kind of good stuff you CAN'T buy in the store.

This was my first attempt at anything granola and

it

is

good!!!!!

PICT0005

So good, in fact, that I made a batch of Grandma’s Granola (not my grandma by the way…I found the recipe here) and some ridiculously easy yogurt on Saturday and another batch last night.  Read:  my family has eaten 8 cups of granola & 10 cups of yogurt in less than 1 week!  Yeah, it’s THAT good.  And did I mention, easy!?  *If you don’t have all of the granola ingredients in your house…it’s a VERY forgiving recipe!  I used all purpose flour instead of soy, almonds (in my 2nd batch) instead of soy nuts because I was out of them, dates instead of dried cherries, and coconut oil instead of canola or olive.  I’d stick with the canola or olive oil listed though.*


“Crock pot” Yogurt

*I’m pretty sure the original recipe came from the book “The Backyard Homestead.”*  I wrote down the recipe on a piece of paper, but didn’t write down where it came from…but I’m pretty sure.  I ended up tweaking it a bit…this is what I came up with.*

2 quarts milk

2/3 c sweeter (sugar/syrup/honey/etc.)

2 T flavoring extract (we use vanilla)

2/3 c powered milk

6 rounded Tablespoons PLAIN yogurt (use organic like Stoneyfield, don’t go the cheap-stuff!!)

Kitchen thermometer, crockpot, jars & lids

Gather jars and place in crockpot (make sure they will all fit. We use 4 pint sized jars, 1 stage 3 baby food jar, and 1 bouillon cube jar in a 5 quart –i think- crockpot. You’ll have about 10 cups of yogurt. If your crockpot won’t hold that much, make only half the recipe or use 2 crockpots.)

  1. Pour milk into thick bottomed pan. Scald milk (by heating to 185 degrees on med-high while stirring constantly.)
  2. Remove from heat and stir in sweetener (we use 1/3 c sugar & 1/3 c honey.)
  3. After dissolving sweetener, stir in extract/spices. *You can add spices like cinnamon (2 teaspoons) if desired.* Then, stir in powdered milk.
  4. Let cool to 110 degrees. (If you don’t put this in the freezer, you will be waiting ALL DAY on this stuff to cool.)  When yogurt is almost cool, place jars (without lids on) in crockpot preheat crockpot for about 15 minutes on low.
  5. Once yogurt is 110 degrees, stir in plain yogurt (or yogurt culture) and pour into warm jars and put the lids on.
  6. Turn off crockpot and place covered containers inside. Cover & wrap in a large towel. Do NOT move the crockpot while yogurt is culturing. Let sit 5-7 hours.
  7. Remove from crockpot and chill in fridge.  The yogurt will thicken a bit more after it has cooled.
  8. You can add fruit, jam, granola upon serving.

*You may also use a dehydrator/oven to culture yogurt as well. Set the temperature to 100 degrees for 5-6 hours.

PICT0009

My mismatched jars of yogurt about to go in the fridge after “incubating” in the crockpot overnight.  Sadly, the mismatched jars drive me crazy because I like things uniform, but they’re what fits in my crockpot.

TROUBLESHOOTING

*Yogurt won’t thicken

  • Starter inactive
  • Not enough starter
  • Incubating temp too hot/cold (usually too hot)
  • Culture moved/stirred while incubating
  • Utensils not clean

* Yogurt too thin

  • Starter inactive or too old

*Whey separates from yogurt

  • Incubated too long
  • Moved/stirred while incubating

*Yogurt is too tart

  • Yogurt incubated too long

This recipe was my fourth attempt at Crockpot yogurt.  The first (and second) involved using ONLY the Crockpot and it came out all runny and smoothie like (which is ok if you WANT a smoothie, but I wanted yogurt you could eat with a spoon, not a straw.)  I made the “other stuff” twice, just to be sure I hadn’t messed it up somehow, but it was just NOT a fit for us.  THIS recipe, however, IS a fit.  (I’ve made it twice too…just to be safe.)  Wow. 

PICT0022

This is my favorite way to eat it…stirred up with the fantastic granola.  Actually, I use it as “milk” on my granola “cereal.”  YUMMY!!!

Even if it wasn’t REALLY, REALLY good.  It’s incredibly WAY cheaper!!!  I can usually get a gallon of fat free (non—organic) milk on sale for around $3, usually for less.  Earth Fare has been selling their individual Stoneyfield yogurts for $0.80 each.  The other ingredients I keep in my cupboard, so their cost is minimal.  So, I can make 80 ounces of yogurt for less than $3.  OR, I can buy the store brand yogurt on sale 3 for $1 (6 oz containers.)  Equal amounts of yogurt:

$3 crockpot yogurt

$13  store brand yogurt

I might even splurge and go with organic milk (wish I could find raw milk that wasn’t a zillion dollars) next time and STILL come out ahead$$.  Let’s not EVEN begin to compare organic yogurt prices to this!!!!! 

I highly advice you to make some of your own.  :o)

Swidget 1.0

Path to Freedom

Garden Time